Removing tile grout can be a challenging yet rewarding task, whether you’re repairing damaged tiles, replacing old grout, or preparing for a fresh installation. While it might seem like a daunting job, with the right tools, techniques, and patience, you can achieve professional-looking results. Over the years, I’ve tackled several grout removal projects—some out of necessity, others for aesthetic upgrades—and I’ve learned that preparation and precision are key.
In this guide, we’ll walk you through everything you need to know about removing tile grout safely and effectively. From choosing the right tools to executing the process step by step, you’ll gain the confidence to tackle this DIY project on your own. Let’s get started!
1. Why Remove Tile Grout? Understanding the Purpose
Before diving into the how-to, it’s important to understand why you might need to remove grout in the first place. Common reasons include:
- Cracked or Damaged Grout: Over time, grout can crack, chip, or wear down, compromising the integrity of your tiled surface.
- Mold or Mildew Buildup: If cleaning isn’t enough to eliminate stubborn mold or mildew, removing and replacing the grout may be necessary.
- Tile Replacement: To replace a broken or outdated tile, you’ll need to remove the surrounding grout first.
- Aesthetic Upgrades: Updating the color or type of grout can refresh the look of your space without replacing the entire tile installation.
Knowing your goal will help you approach the project with clarity and purpose.
2. Gather Your Tools: Essential Equipment for Grout Removal
Having the right tools makes all the difference when removing grout. Here’s what you’ll need:
Hand Tools:
- Grout Removal Tool: A manual tool with a sharp blade designed specifically for scraping grout.
- Utility Knife: Useful for cutting through soft grout lines.
- Flathead Screwdriver: Can work as an alternative to a grout removal tool but requires caution.
Power Tools:
- Oscillating Multi-Tool: Equipped with a carbide-grit blade, this is one of the most efficient tools for grout removal.
- Dremel Rotary Tool: With a grout bit attachment, it’s ideal for smaller areas or detailed work.
Safety Gear:
- Safety Glasses: Protect your eyes from flying debris.
- Dust Mask: Prevent inhalation of fine grout particles.
- Gloves: Shield your hands from sharp edges and rough surfaces.
Cleaning Supplies:
- Vacuum: For clearing dust and debris.
- Soft Brush or Cloth: To clean tiles after grout removal.
- Grout Cleaner: Optional for pre-cleaning before starting.
3. Prepare the Area: Setting the Stage for Success
Proper preparation ensures a smooth and safe process. Follow these steps:
- Clear the Space: Remove furniture, rugs, or any items near the work area to prevent damage or obstruction.
- Protect Surrounding Surfaces: Use painter’s tape to cover adjacent tiles and edges. Lay down drop cloths to catch dust and debris.
- Ventilate the Room: Open windows and doors to improve airflow, especially if using power tools that generate dust.
- Inspect the Grout: Identify weak or crumbling sections where removal will be easier. Mark areas that require extra care.
4. Manual Grout Removal: The Traditional Approach
If you prefer a hands-on method or are working in tight spaces, manual grout removal is a viable option.
Steps:
- Score the Grout Line: Use a utility knife or grout removal tool to create shallow grooves along the grout line. This loosens the material and makes it easier to scrape away.
- Scrape Away the Grout: Hold the tool at a low angle (about 45 degrees) and apply steady pressure to chip away the grout. Work slowly to avoid damaging the tiles.
- Clean as You Go: Periodically vacuum the area to remove loose debris and maintain visibility.
Why It Works:
Manual removal gives you precise control over the process, reducing the risk of scratching or chipping tiles. However, it can be labor-intensive and time-consuming, especially for large areas.
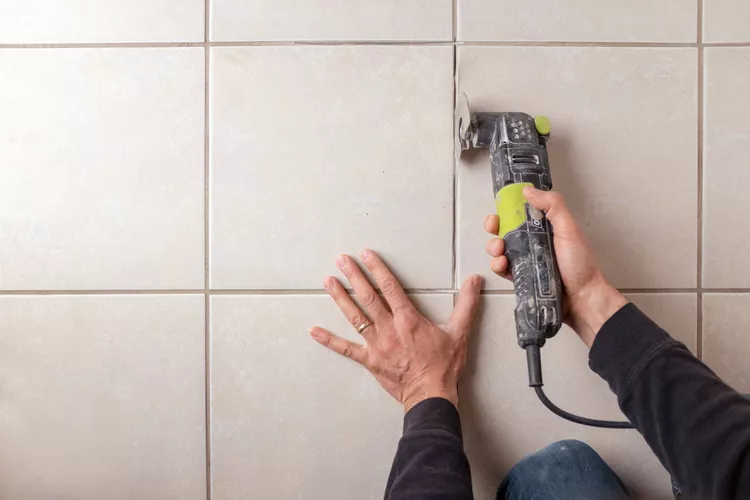
5. Power Tool Grout Removal: Speed and Efficiency
For larger projects or tougher grout, power tools significantly speed up the process.
Steps:
- Attach the Right Blade: Use a carbide-grit blade for oscillating multi-tools or a grout bit for rotary tools. Ensure the blade depth matches the thickness of the grout line.
- Start Slowly: Begin at a low speed to avoid gouging the tiles. Gradually increase the speed as you become comfortable with the tool.
- Follow the Grout Line: Move the tool steadily along the grout, applying gentle pressure. Focus on removing only the grout without digging into the tile or mortar bed.
- Vacuum Frequently: Pause periodically to clear dust and debris, which can obscure your view and clog the tool.
Why It Works:
Power tools provide consistent and efficient results, making them ideal for extensive grout removal jobs. Just be mindful of tile fragility and adjust your technique accordingly.
6. Dealing with Stubborn Grout: Tips and Tricks
Sometimes, grout proves particularly resistant. Here’s how to handle tough situations:
- Soften Old Grout: Apply a grout softener solution to weaken hardened grout before scraping.
- Use a Chisel: For extremely stubborn spots, gently tap a narrow chisel with a hammer to break up the grout.
- Avoid Overheating Tiles: If using power tools, take breaks to prevent excessive heat buildup, which can damage delicate tiles.
7. Finishing Touches: Cleaning and Preparing for New Grout
Once the old grout is removed, proper cleanup is essential for a seamless reapplication.
Steps:
- Vacuum Thoroughly: Remove all remaining dust and debris from the joints and surrounding area.
- Wipe Down Tiles: Use a damp cloth or sponge to clean the tiles and ensure no residue remains.
- Check for Damage: Inspect the tiles and substrate for cracks or chips. Repair any issues before proceeding.
- Apply New Grout: Mix and apply fresh grout according to the manufacturer’s instructions. Smooth it evenly into the joints and wipe away excess with a damp sponge.
8. Preventative Measures: Extending the Life of Your Grout
To minimize future grout problems, follow these tips:
- Seal the Grout: After curing, apply a high-quality grout sealer to protect against moisture, stains, and mold.
- Regular Cleaning: Maintain your grout by cleaning it regularly with a pH-neutral cleaner.
- Address Issues Early: Fix minor cracks or stains promptly to prevent them from worsening.
Final Thoughts: A Job Well Done
Removing tile grout may not be the easiest DIY project, but with patience and the right approach, it’s entirely manageable. Through my own experiences, I’ve found that taking the time to prepare and execute each step carefully leads to satisfying results. Whether you’re restoring an old bathroom or updating your kitchen backsplash, mastering grout removal empowers you to take control of your home’s aesthetics and functionality.
Remember, safety always comes first. Wear protective gear, work methodically, and don’t hesitate to seek professional help if the job becomes overwhelming. With these tips and techniques, you’ll have beautifully refreshed tiles in no time!